Tinyhttpd 源码解析
本文具体解析了开源项目 Tinyhttpd 的源代码,具体源代码可以去 github 上查看
Tinyhttpd 简介
Tinyhttpd 是J.David Blackstone在 1999 年写的一个不到 500 行的超轻量型 Http Server,用来学习非常不错,可以帮助我们真正理解服务器程序的本质。
我们先是一张流程图, 了解 Tinyhttpd 是如何运作的。
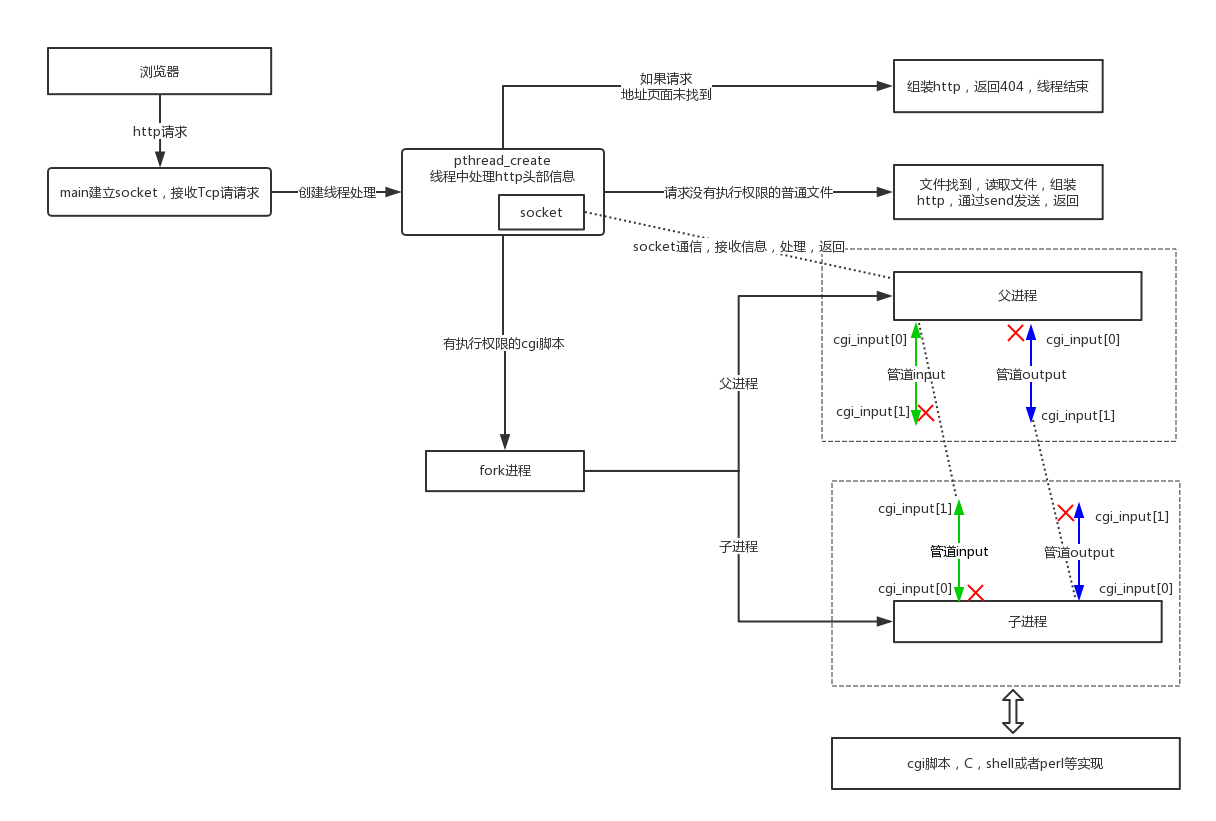
整体的工作流程如下:
- 服务器启动,在指定端口或随机选取端口绑定 httpd 服务。
- 收到一个 HTTP 请求时,派生一个线程运行
accept_request函数。 - 取出 HTTP 请求中的 method (GET 或 POST) 和 url,。对于 GET 方法,如果有携带参数,则 query_string 指针指向 url 中 ? 后面的 GET 参数。
- 将格式化后 url 存入 path 字符串,表示浏览器请求的服务器文件路径,在 tinyhttpd 中服务器文件是在 htdocs 文件夹下。当 url 以 / 结尾,或 url 是个目录,则在 path 末尾加上 index.html,表示访问主页。
- 如果文件路径合法,对于无参数的 GET 请求,直接将文件内容写入客户端套接字。其他情况(带参数 GET,POST 方式,url 为可执行文件),则调用
excute_cgi函数执行 cgi 脚本。 - 如果是 POST 则找出 Content-Length
- 建立两个管道,cgi_input 和 cgi_output, 并 fork 一个进程。
- 将 cgi_input 与子进程的
stdin绑定,cgi_output 与子进程的stdout,设置环境变量,然后执行 cgi 脚本 - 父进程可以通过 cgi_input 和 cgi_output 获取子 cgi 脚本的标准输入和标准输出
接着我们按照源代码,按照 main –> startup –>accept_request –> execute_cgi 顺序依次对每个函数的具体功能进行分析。
由于代码中存在大量的 linux API 调用,我们以 《The Linux Promgramming Interface》中的说明为准。
标准 GET/POST 请求格式
由于 Tinyhttpd 中涉及 GET POST 请求的处理,我们先看一下标准的 GET POST 请求的格式。
GET / HTTP/1.1
Host: 192.168.0.23:47310
Connection: keep-alive
...
GET 请求相对简单,在 GET 后面跟上具体的 url,剩余的信息对我们暂时没用。
POST / color1.cgi HTTP / 1.1
Host: 192.168.0.23 : 47310
Connection : keep - alive
Content - Length : 10
...
Form Data
color=gray
POST 请求相对复杂一些,我们需要提取出其中的 Content-Length,按照其大小去获取实际的具体信息。
主函数 main
以下为 main 函数的具体代码:
int main(void)
{
    int server_sock = -1;
    u_short port = 4000;
    int client_sock = -1;
    // sockaddr_in 是 IPV4的套接字地址结构  --《TLPI》P1202
    struct sockaddr_in client_name;
    socklen_t client_name_len = sizeof(client_name);
    pthread_t newthread;

    server_sock = startup(&port);
    printf("httpd running on port %d\n", port);

    while (1)
    {
        // 阻塞等待客户端的连接 --《TLPI》P1157
        client_sock = accept(server_sock,
                (struct sockaddr *)&client_name,
                &client_name_len);
        if (client_sock == -1)
            error_die("accept");
        /* accept_request(&client_sock); */
        if (pthread_create(&newthread , NULL, (void *)accept_request,
                (void *)(intptr_t)client_sock) != 0)
            perror("pthread_create");
    }

    close(server_sock);

    return 0;
}
函数的处理流程如下:
- 用
startup函数初始化了一个和 4000 端口绑定的套接字 - 进入一个循环,通过
accept函数接受客户端请求 - 如果有请求,通过
pthread_create建立一个新的线程 - 在线程中,调用
accept_request函数,处理请求,实现一个多线程同步服务
关于 startup 和 accept 函数的相关内容,下文会有具体的分析。这里我们重点讲解一下 accept 函数。
int accept(int sockfd, struct sockaddr *addr, socklen_t *addrlen);
accept 函数接收一个套接字的文件描述符,以及 ipv4 地址结构,函数返回一个新的套接字,通过该套接字与客户端通信。该函数有两个重要的特点:
- 如果没有
connect请求,函数调用会被阻塞,直到接收到connect请求 - 在与客户端的套接字建立连接时,
accept函数创建一个新的套接字,并用新的套接字与客户端连接,原始的套接字依然处于打开状态,可以用于继续监听端口。
在这里,程序调用 pthread_create 实现了多线程的处理。由于 accept_request 函数中涉及大量的 I/O,所以使用多线程能够提高程序的效率。
套接字初始化函数 startup
函数源代码如下:
int startup(u_short *port)
{
    int httpd = 0;
    int on = 1;
    struct sockaddr_in name;

    // 创建套接字(因特网地址族、流套接字和默认协议)
    httpd = socket(PF_INET, SOCK_STREAM, 0);
    if (httpd == -1)
        error_die("socket");
    // 初始化结构体
    memset(&name, 0, sizeof(name));
    name.sin_family = AF_INET;
    name.sin_port = htons(*port);
    // INADDR_ANY是一个 IPV4通配地址的常量
    // 大多实现都将其定义成了 0.0.0.0 --《TLPI》P1187
    name.sin_addr.s_addr = htonl(INADDR_ANY);
    // 允许重用本地地址和端口 --《TLPI》P1279
    if ((setsockopt(httpd, SOL_SOCKET, SO_REUSEADDR, &on, sizeof(on))) < 0)
    {
        error_die("setsockopt failed");
    }
    // bind()用于绑定地址与 socket --《TLPI》P1153
    // 如果传进去的sockaddr结构中的 sin_port 指定为0,这时系统会选择一个临时的端口号
    if (bind(httpd, (struct sockaddr *)&name, sizeof(name)) < 0)
        error_die("bind");
    // 如果调用 bind 后端口号仍然是0,则手动调用 getsockname() 获取端口号
    if (*port == 0)
    {
        socklen_t namelen = sizeof(name);
        // 调用 getsockname()获取系统给 httpd 随机分配的端口号 --《TLPI》P1263
        if (getsockname(httpd, (struct sockaddr *)&name, &namelen) == -1)
            error_die("getsockname");
        *port = ntohs(name.sin_port);
    }
    // 让 httpd 监听 request --《TLPI》P1156
    if (listen(httpd, 5) < 0)
        error_die("listen");
    return httpd;
}
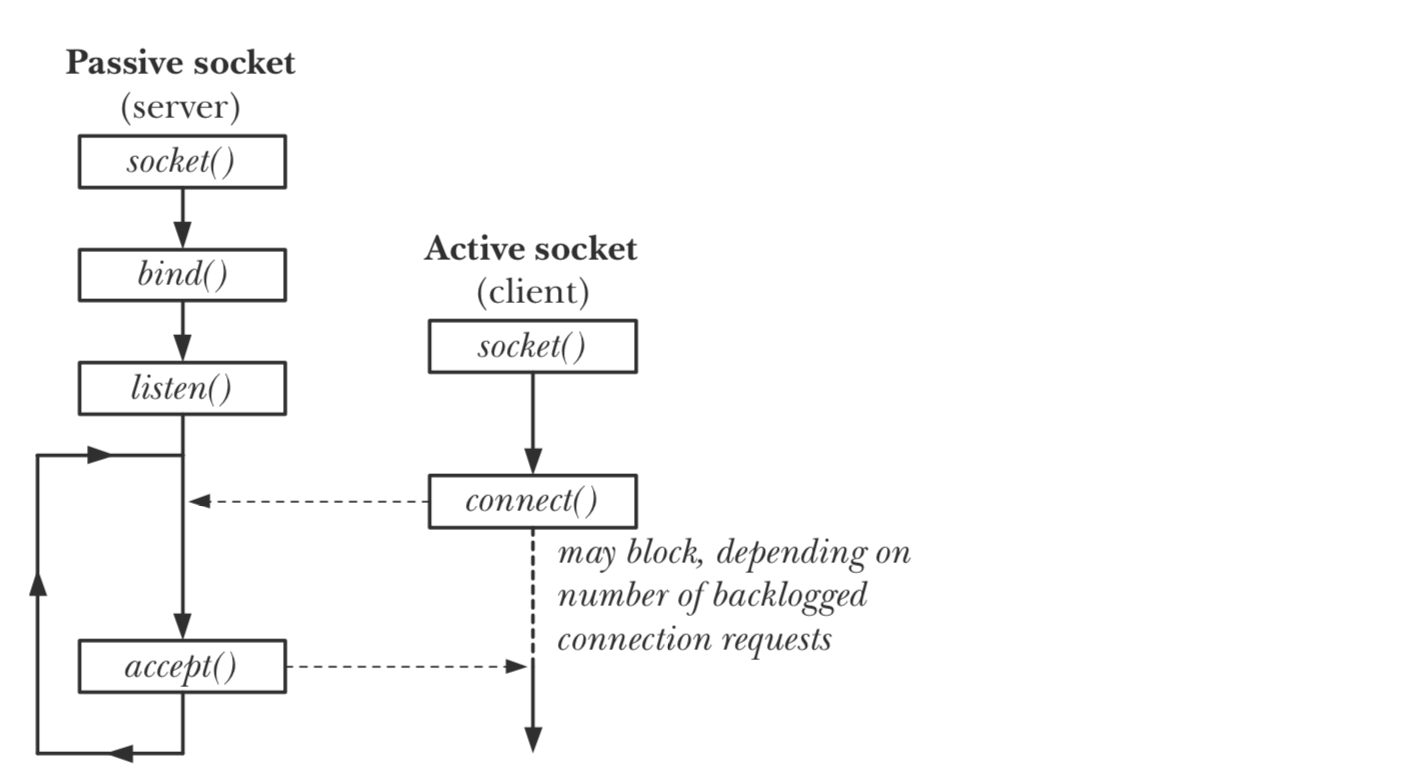
其整体流程如下:
- 调用
socket函数,创建一个一套接字 - 创建
sockaddr_in结构体,并设置对应的 ip 和 端口 - 通过
bind函数,绑定套接字的 ip 和 端口 - 调用
listen函数,监听请求
下面是对一些细节的具体分析,首先我们来看一下 sockaddr_in 结构体
struct in_addr {                /* IPv4 4-byte address */
    in_addr_t s_addr;           /* Unsigned 32-bit integer */
};

struct sockaddr_in {            /* IPv4 socket address */
    sa_family_t    sin_family;  /* Address family (AF_INET) */
    in_port_t      sin_port;    /* Port number */
    struct in_addr sin_addr;    /* IPv4 address */
    unsigned char  __pad[X];    /* Pad to size of 'sockaddr'
};                                 structure (16 bytes) */
这里面主要包含了 ipv4 地址信息和端口信息。
由于 in_addr 结构体中保存了以 32 为 int 格式的 ipv4 地址,我们需要调用 htonl 函数,将字符串格式的 ip 地址转换为整型格式的 ip 地址。其中 INADDR_ANY 代表了一个特殊的 ip 地址常量,此时主机的所有网络接口都可以接收请求(如果主机有多个网卡,程序会监听每个网卡对应 ip 地址的端口)。
name.sin_addr.s_addr = htonl(INADDR_ANY);
接着,程序调用 setsocket 函数,设定了套接字的一些特性,我们重点说一下其中的一个参数 SO_REUSEADDR。
setsockopt(httpd, SOL_SOCKET, SO_REUSEADDR, &on, sizeof(on))
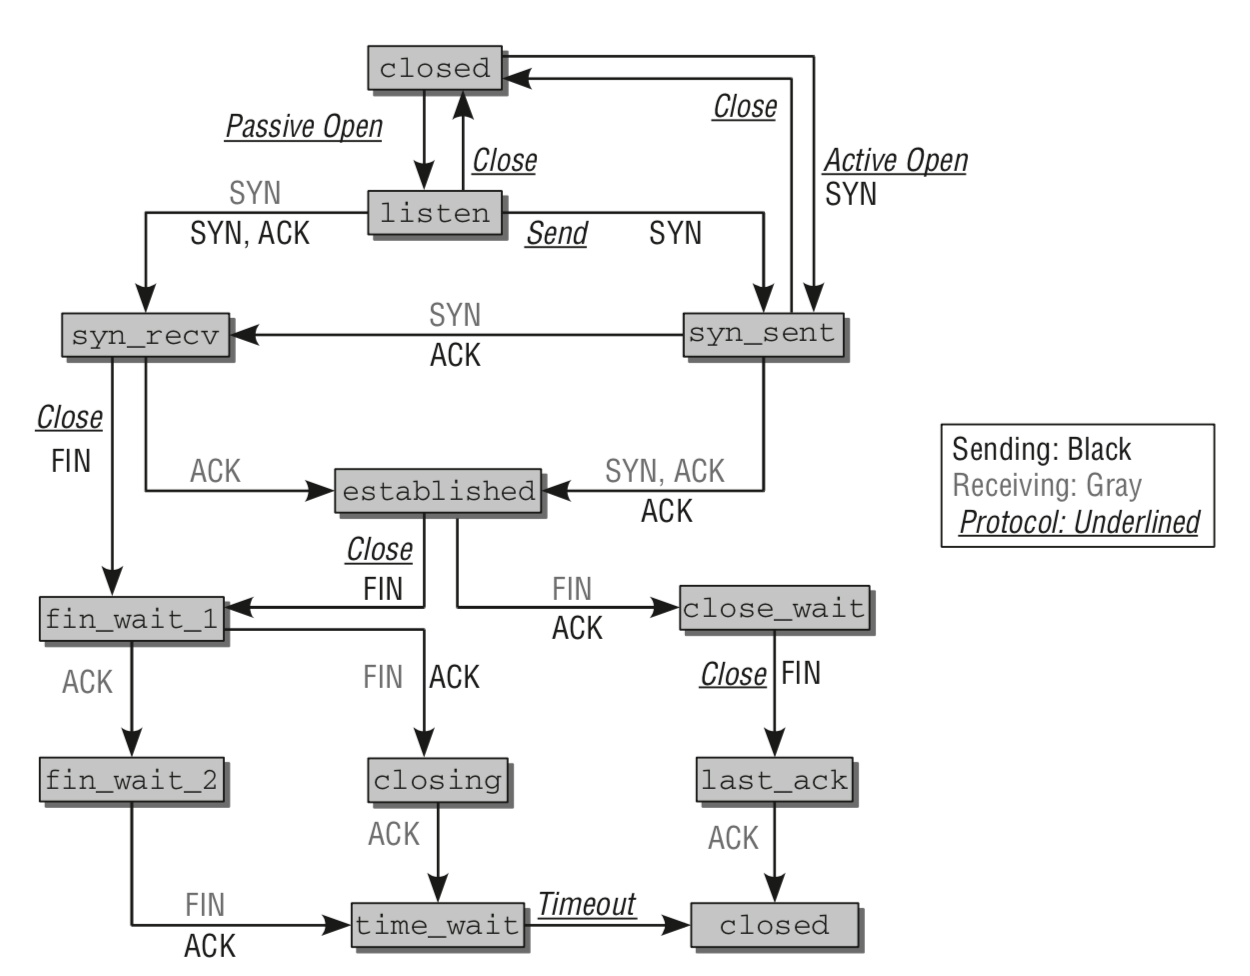
在 TCP 连接中,当端口收到或者发送 FIN/ACK 请求后,端口并不会立即释放,而是处于 TIME_WAIT 状态(该状态一般持续 2 分钟),此时端口是无法与套接字绑定的。设置 SO_REUSEADDR 可以让套接字绑定处于 TIME_WAIT 状态的端口。
设置好套接字之后,程序调用 bind 函数,将套接字和地址信息绑定。
bind(httpd, (struct sockaddr *)&name, sizeof(name))
如果 sockaddr_in 的端口设置为 0,或者程序没有调用 bind 程序绑定端口,直接调用 listen 函数,那么内核会给套接字绑定一个临时分配的端口。此时需要调用 getsockname 获取具体的端口信息。
最后,我们调用 listen 函数,让套接字进入被动监听状态。
listen(httpd, 5)
其中第二个参数代表请求队列的长度。
当套接字正在处理客户端请求时,如果有新的请求进来,套接字是没法处理的,只能把它放进缓冲区,待当前请求处理完毕后,再从缓冲区中读取出来处理。如果不断有新的请求进来,它们就按照先后顺序在缓冲区中排队,直到缓冲区满。这个缓冲区,就称为请求队列(Request Queue)。
当请求队列满时,就不再接收新的请求。
整体调用顺序如下图所示:
请求处理函数 accept_request
函数源代码如下:
oid accept_request(void *arg)
{
    int client = (intptr_t)arg;
    char buf[1024];
    size_t numchars;
    char method[255];
    char url[255];
    char path[512];
    size_t i, j;
    // 包含文件信息的数据--《TLPI》P280
    struct stat st;
    int cgi = 0;      /* becomes true if server decides this is a CGI
                       * program */
    char *query_string = NULL;

    // 读 http 请求的第一行数据(request line),把请求方法存进 method 中
    numchars = get_line(client, buf, sizeof(buf));
    i = 0; j = 0;
    while (!ISspace(buf[i]) && (i < sizeof(method) - 1))
    {
        method[i] = buf[i];
        i++;
    }
    j=i;
    method[i] = '\0';

    // 如果既不是 GET 也不是 POST,直接发送 response 告诉客户端没实现该方法
    if (strcasecmp(method, "GET") && strcasecmp(method, "POST"))
    {
        unimplemented(client);
        return;
    }

    // 如果是 POST 方法就,开启 cgi
    if (strcasecmp(method, "POST") == 0)
        cgi = 1;

    i = 0;
    // 跳过空白字符
    while (ISspace(buf[j]) && (j < numchars))
        j++;
    // 读取 url
    while (!ISspace(buf[j]) && (i < sizeof(url) - 1) && (j < numchars))
    {
        url[i] = buf[j];
        i++; j++;
    }
    url[i] = '\0';

    // 如果是 GET 请求,
    if (strcasecmp(method, "GET") == 0)
    {
        query_string = url;
        // 检查 url 中是否存在 ?
        while ((*query_string != '?') && (*query_string != '\0'))
            query_string++;
        // GET请求中,?后面为参数
        if (*query_string == '?')
        {
            // 开启 cgi
            cgi = 1;
            *query_string = '\0';
            query_string++;
        }
    }

    sprintf(path, "htdocs%s", url);
    // 如果以 / 结尾,在后面加上 index.html
    if (path[strlen(path) - 1] == '/')
        strcat(path, "index.html");
    // 根据路径找到对应文件 --《TLPI》P279
    if (stat(path, &st) == -1) {
        while ((numchars > 0) && strcmp("\n", buf))
            numchars = get_line(client, buf, sizeof(buf));
        // return 404
        not_found(client);
    }
    else
    {
        // 如果是个目录,则默认使用该目录下 index.html 文件 --《TLPI》P282
        if ((st.st_mode & S_IFMT) == S_IFDIR)
            strcat(path, "/index.html");
        // 如果文件有可执行权限,开启 cgi --《TLPI》P295
        if ((st.st_mode & S_IXUSR) ||
                (st.st_mode & S_IXGRP) ||
                (st.st_mode & S_IXOTH))
            cgi = 1;
        // 不是 cgi,直接把服务器文件返回,否则执行 cgi
        if (!cgi)
            serve_file(client, path);
        else
            execute_cgi(client, path, method, query_string);
    }

    // 断开与客户端的连接
    close(client);
}
accept_request 虽然较长,但其中主要涉及的是对于 request header 的处理,逻辑并不复杂,整体流程如下:
- 提取 request 的类型(GET 或 POST)
- 提取 url 信息
- 如果是 GET 请求,提取 url 中的参数信息(?之后的内容)
- 如果 url 结尾是 / 或者改地址对应一个目录,默认调用该目录下的 index.html
- 如果不是 CGI,则调用
serve_file,将地址中的内容返回给客户端 - 如果是 CGI,调用
execute_cgi,执行 CGI 脚本程序 - 断开连接
在对 request header 的处理中,大量调用了 get_line 函数。该函数用于读取文件的下一行信息,适用于不同的换行符(\n 或 \r\n)。
程序使用 stat 函数,确认路径所对应的文件状态。
int stat(const char *pathname, struct stat *statbuf);
stat 结构体保存了文件的具体信息
struct stat {
	dev_t       st_dev;         /* ID of device containing file */
	ino_t       st_ino;         /* File serial number */
	mode_t      st_mode;        /* File type and permissions */
	nlink_t     st_nlink;       /* Number of hard links */
	uid_t       st_uid;         /* User ID of the file */
	gid_t       st_gid;         /* Group ID of the file */
	dev_t       st_rdev;        /* Device ID */
	off_t       st_size;        /* file size, in bytes */
	blkcnt_t    st_blocks;      /* blocks allocated for file */
	blksize_t   st_blksize;     /* optimal blocksize for I/O */
	time_t      st_atime;       /* time of last access */
	time_t      st_mtime;       /* time of last data modification */
	time_t      st_ctime;       /* time of last status change */
};
可以通过 stat.st_mode,来获取文件的类型信息
| Constant | Test macro | File type |
|---|---|---|
| S_IFREG | S_ISREG() | Regular file |
| S_IFDIR | S_ISDIR() | Directory |
| S_IFCHR | S_ISCHR() | Character device |
| S_IFBLK | S_ISBLK() | Block device |
| S_IFIFO | S_ISFIFO() | FIFO or pipe |
| S_IFSOCK | S_ISSOCK() | Socket |
| S_IFLNK | S_ISLNK() | Symbolic link |
$$~$$
同时可以获取文件的权限信息
| Constant | Octal value | Permission bit |
|---|---|---|
| S_ISUID | 04000 | Set-user-ID |
| S_ISGID | 02000 | Set-group-ID |
| S_ISVTX | 01000 | Sticky |
| S_IRUSR | 0400 | User-read |
| S_IWUSR | 0200 | User-write |
| S_IXUSR | 0100 | User-execute |
| S_IRGRP | 040 | Group-read |
| S_IWGRP | 020 | Group-write |
| S_IXGRP | 010 | Group-execute |
| S_IROTH | 04 | Other-read |
| S_IWOTH | 02 | Other-write |
| S_IXOTH | 01 | Other-execute |
CGI 执行函数 execute_cgi
函数源代码如下:
void execute_cgi(int client, const char *path,
        const char *method, const char *query_string)
{
    char buf[1024];
    // 2个管道
    int cgi_output[2];
    int cgi_input[2];
    pid_t pid;
    int status;
    int i;
    char c;
    // 读取的字符数
    int numchars = 1;
    // http 的 content_length
    int content_length = -1;

    buf[0] = 'A'; buf[1] = '\0';
    if (strcasecmp(method, "GET") == 0)
        // 读取并丢弃 http header
        while ((numchars > 0) && strcmp("\n", buf))
            numchars = get_line(client, buf, sizeof(buf));
    else if (strcasecmp(method, "POST") == 0) /*POST*/
    {
        numchars = get_line(client, buf, sizeof(buf));
        while ((numchars > 0) && strcmp("\n", buf))
        {
            // 如果是POST请求,就需要得到 Content-Length
            // Content-Length 字符串长度为15
            // 从 17 位开始是具体的长度信息
            buf[15] = '\0';
            if (strcasecmp(buf, "Content-Length:") == 0)
                content_length = atoi(&(buf[16]));
            numchars = get_line(client, buf, sizeof(buf));
        }
        if (content_length == -1) {
            bad_request(client);
            return;
        }
    }

    // pipe() 建立 output 管道 --《TLPI》P892
    if (pipe(cgi_output) < 0) {
        cannot_execute(client);
        return;
    }
    // 建立 input 管道
    if (pipe(cgi_input) < 0) {
        cannot_execute(client);
        return;
    }

    if ( (pid = fork()) < 0 ) {
        cannot_execute(client);
        return;
    }
    sprintf(buf, "HTTP/1.0 200 OK\r\n");
    send(client, buf, strlen(buf), 0);
    // 子进程用于执行 cgi
    if (pid == 0)  /* child: CGI script */
    {
        char meth_env[255];
        char query_env[255];
        char length_env[255];
        // 将子进程的 stdout 重定向到 cgi_ouput 的管道写端上
        // 将 stdin 重定向到 cgi_input 管道的读端上,并关闭管道的其他端口
        // dup2() --《TLPI》P97
        dup2(cgi_output[1], STDOUT);
        dup2(cgi_input[0], STDIN);
        close(cgi_output[0]);
        close(cgi_input[1]);
        // 设置 cgi 环境变量 putenv() --《TLPI》P128
        sprintf(meth_env, "REQUEST_METHOD=%s", method);
        putenv(meth_env);
        if (strcasecmp(method, "GET") == 0) {
            sprintf(query_env, "QUERY_STRING=%s", query_string);
            putenv(query_env);
        }
        else {   /* POST */
            sprintf(length_env, "CONTENT_LENGTH=%d", content_length);
            putenv(length_env);
        }
        // 将子进程替换成另一个进程并执行 cgi 脚本
        // execl() 包含于<unistd.h>中 --《TLPI》P567
        execl(path, NULL);
        exit(0);
    } else {    /* parent */
        // 父进程关闭 cgi_output 管道的写端和 cgi_input 的读端
        close(cgi_output[1]);
        close(cgi_input[0]);
        if (strcasecmp(method, "POST") == 0)
            // 根据 content_length 读取客户端的信息
            // 并通过 cgi_input 传入子进程的标准输入
            for (i = 0; i < content_length; i++) {
                recv(client, &c, 1, 0);
                write(cgi_input[1], &c, 1);
            }
        // 通过 cgi_output,获取子进程的标准输出
        // 并将其写入到客户端
        while (read(cgi_output[0], &c, 1) > 0)
            send(client, &c, 1, 0);
        // 关闭管道端口,等待子进程结束,退出程序:
        close(cgi_output[0]);
        close(cgi_input[1]);
        waitpid(pid, &status, 0);
    }
}
函数的整体流程如下:
- 对 POST 请求,根据 Content-Length 提取 body 中的信息
- 创建两个管道 cgi_input 和 cgi_output 用于进程间通信
- 调用
fork建立子进程 - 子进程调用
dup2将标准输入与标准输出分别重定向到对应管道的读端和写端 - 在子进程中设置环境变量,并调用
execl,执行 CGI 脚本 - 父进程通过管道向 CGI 脚本传入参数,并获取脚本的返回结果,再将结果传给客户端
- 父进程等待子结束
这里我们要重点解释下父进程与子进程如何通过管道实现进程间的通信。
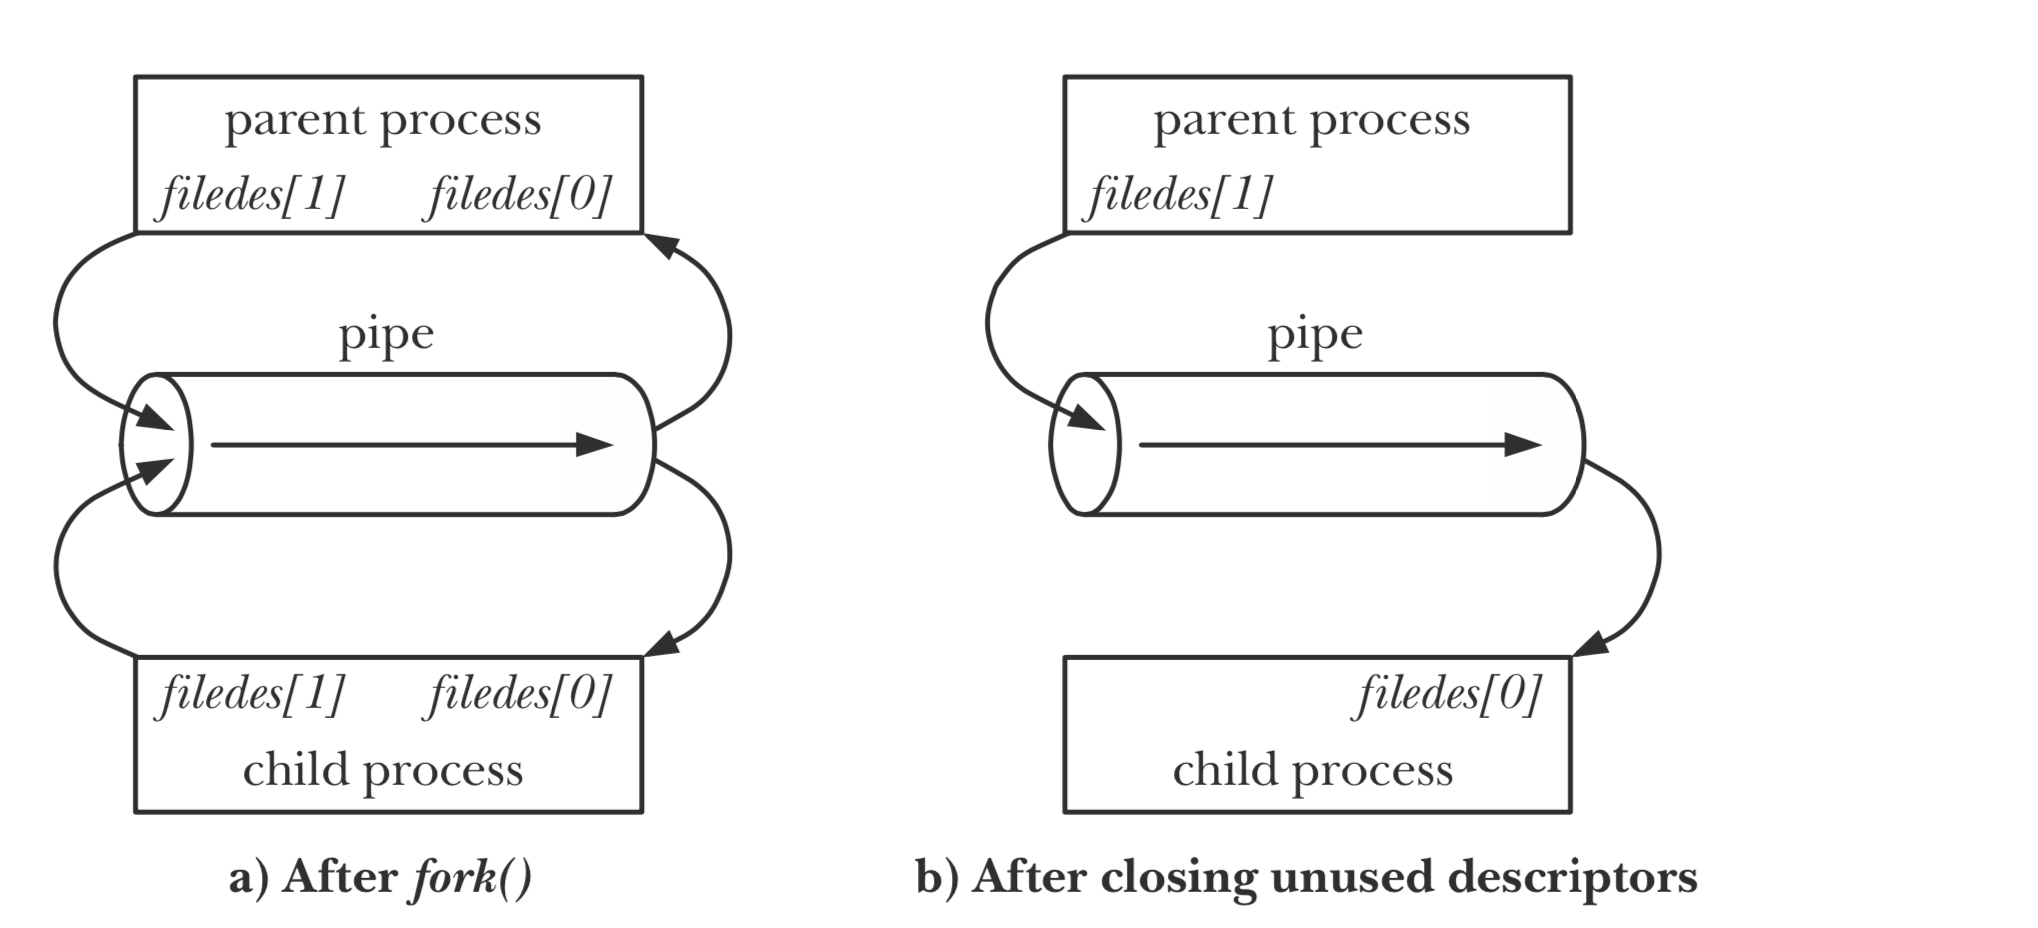
int pipe(int filedes[2]);
调用 pipe 函数,得到两个文件描述符,分别对应管道的读端 filedes[0] 和写端 filedes[1],当程序在写端写入数据时,在读端可以读取到写入的数据。接着,我们通过 fork 函数,得到一个子进程。由于子进程和父进程拥有完全相同的变量,因此子进程也有对应管道读端和写端的两个文件描述符。之后,只需要关闭一侧的读端和另一侧的写端,就可以实现进程间的通信。
接着,程序调用 dup2 函数,对子进程的标准输入和标准输出进行重定向。
dup2(cgi_output[1], STDOUT);
dup2(cgi_input[0], STDIN);
dup2 能够将两个文件描述符进行绑定,使他们实际指向同一个文件。在这里实现了以下功能:
- 子进程的标准输出将会写入到
cgi_output的写端 cgi_input读端读取的数据将会作为子进程的标准输入
在子进程完成标准输入和标准输出的重定向之后,调用 execl 函数,执行 CGI 脚本。
execl(path, NULL);
该函数会让进程加载新的程序,之前的程序包括缓存的数据都会被丢弃掉。此时,子进程就是 CGI 脚本的执行程序。
而父进程只需要做两件事:
- 调用
recv函数,从客户端中接收数据,并将数据通过cgi_input[1]写入传入 CGI 脚本 - 从
cgi_output[0]中读取 CGI 脚本的返回结果,并调用send函数,将结果发送给客户端
运行程序
源代码的主干部分已经解析完毕,剩余的部分都较为简单,可以直接阅读源代码,这里就不再赘述。
我们先编译代码
$ make
得到客户端 httpd 的可执行文件,在执行之前,必须保证 htdocs 目录下的 index.html 没有可执行权限,CGI 脚本有可执行权限:
$ chmod +x htdocs/*.cgi
$ chmod 600 htdocs/index.html
由于 CGI 脚本使用 perl 编写,需要根据本机的 perl 解释器路径,修改 CGI 脚本的路径设置。
$ which perl
/usr/bin/perl
将脚本的第一行解释器路径改为本机的 perl 路径。
接着直接运行程序
$ ./httpd
httpd running on port 4000
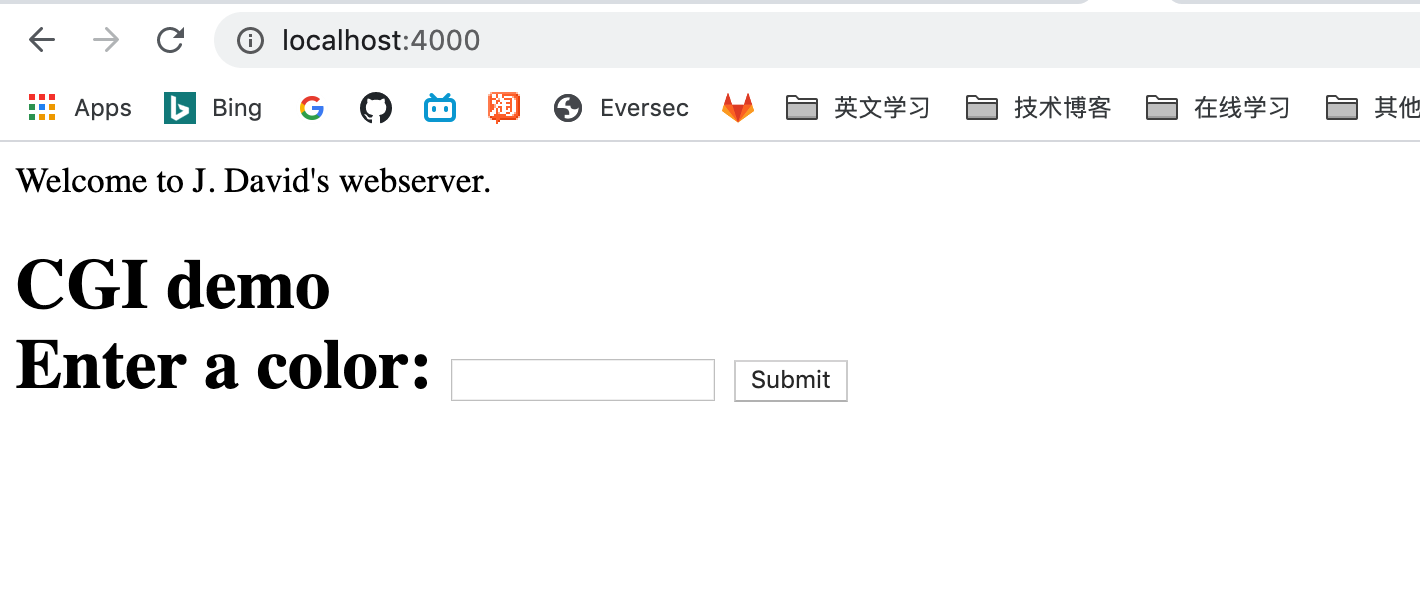
我们在浏览器中打开 localhost:4000,效果如下
在方框中输入颜色信息,效果如下
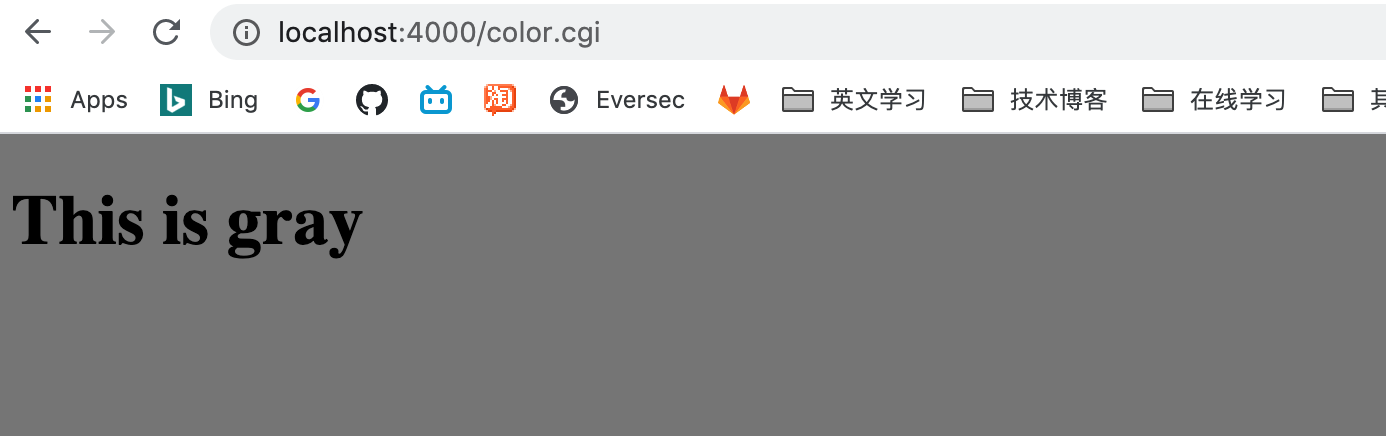
至此,Tinyhttpd 能够正常运行。